This is blog which contains my achievement in masters. I will try to put all the information I got from the university in chronological order.
Saturday, October 17, 2020
Design Pattern Walkthrough
Thursday, October 15, 2020
Create USB Windows 10 Installer in Ubuntu System
As the title clearly says, creating bootable USB in the Ubuntu system is a bit challenging as compared to the Windows system. Windows system provided their own tool and we can seamlessly create a bootable thumb drive. After the less availability of CD ROMs, it is very important to know how to create bootable USB disks.
Yes, I also tried to use some of the tools I was familiar with, such as UnetBootIn, copying with dd tool, etc, but unfortunately, I was unsuccessful. It creates a bootable USB, but the problem, the installation of windows crashes, with some file related error.
Because I did not have any windows system in my machines, and I have to install windows in my newly bought notebook, I have to create anyhow a bootable Windows 10 installer using my Linux machine. I carried out some research on this, got a working tool to create a bootable Windows installer on USB.
1) Installation of WOEUSB command
What I did is, I have first of all run a couple of Linux commands to add the repository, then install the tool.
sudo add-apt-repository ppa:nilarimogard/webupd8
sudo apt udpate
sudo apt intall woeusb
Now installation completes.
2) Get USB Info
We have to find out the usb device id (for example: /dev/sdb or /dev/sdc). Using one of the following commands, we can find out that information:
sudo fdisk -l
lsblk
3) Unmount the USB Disk
This is important, we have to unmount the USB before carrying out the problem. There is a simple command to carry out this task:
sudo umount /dev/sdb1
3) Create the installer
The final step is to run a command to create the actual installer.
sudo woeusb --target-filesystem NTFS --device Win10_2004_English_x64.iso /dev/sdb
Here, Win10_2004_English_x64.iso is the iso file downloaded from the Microsoft site. Which can be freely downloaded.
/dev/sdb is the path of the USB disk.
It can take up to 5-6 minutes depending upon how fast your system is.
After the process finishes, we are ready to use it as a windows 10 installer.
Friday, April 10, 2020
Creating multipurpose executable Jar file
1) Create a Java application
2) Bundling into an executable Jar file
3) Running a Jar file
I take a problem scenario to explain the above steps and how they are carried out.
Problem:
We want to have a java application, which should have addition, subtraction, multiplication and division functionalities, that we can call those functionalities providing the command line parameters. For example
add 2 4 4 (result=2+4+4)
subtract 54 12 (result=54+12)
multiply 12 54 55 (result=12*54*55)
divide 34 17 (result=34/17)
So, let's start:
1) Create a Java application
I am creating a Java application with Gradle as a build tool because it is easy to use. I am creating 4 classes with the main method which is responsible for corresponding operation and parameters. One option could be to create a single method and get an operation as a parameter, which makes it really complex to handle parameters. If we create a main method for each operation, it makes our tasks of handling parameters easy.
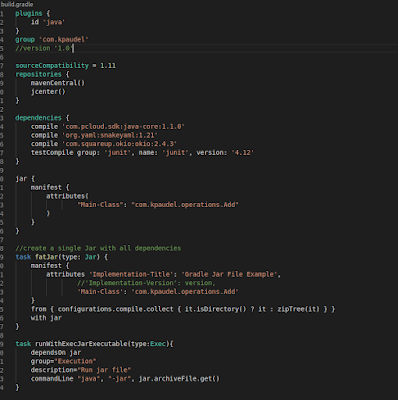
So, I begin with creating four java classes with main method, which manipulates the arguments to get the corresponding result. Because the example task is very simple, our actual task could be way bigger with many dependent libraries. So, we define a bunch of libraries in "build.gradle" file and we create a "fatJar" with all dependencies included in the jar file. An alternative will be we copy dependent libraries in the classpath.
I begin with the fatJar method, which create a jar file with all dependent libraries automatically from gradle. For this, we have to write a method to create fatJar. Have a look at the sample build.gradle file.
File: build.gradle
settings.gradle
The method jar create the jar file without dependencies. But the fatJar create a jar file with all dependencies, and we can use out of the box.
So, after definition of Gradle build information.
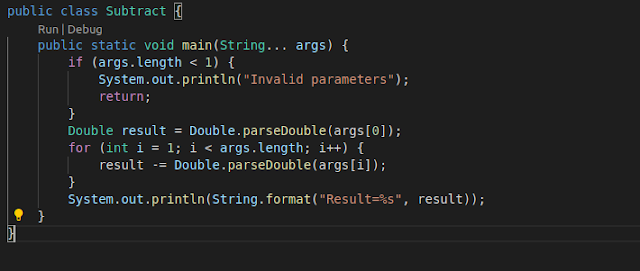
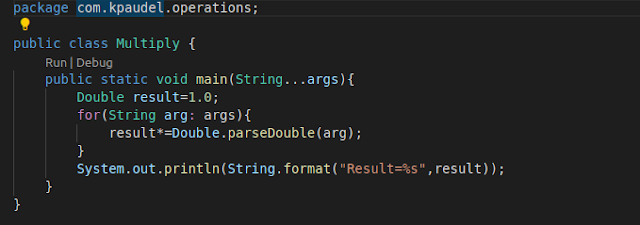
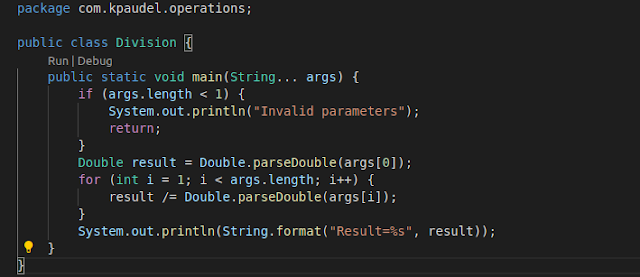
Now, we create class files with specific operation in main methods. The class files look something like this:
Add.java

Subtract.java
Multiply.java
Division.java
The application structure looks like this:
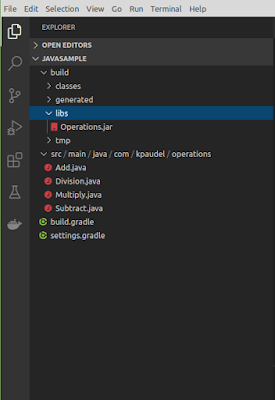
So far, we have created a java application with the required operations.
2) Bundling into an executable Jar file
Bundling into an executable Jar file is quite easy because we have already written a method in build.gradle file above. So, we just call
gradle clean && gradle fatJar
The created Jar file will be in folder build/libs as shown above(Operations.jar)
Note: If we simply run "gradle build", then it will create a thin jar file(i.e. without dependencies)
3) Running a Jar file
The Last Step is to execute the Jar file Operations.jar. The bundled jar file includes all the classes, and we can run all operations providing corresponding arguments.
For example:
java -cp Operations.jar com.kpaudel.operations.Add 12 34.33 45.3
Result=91.63
I hope you have enjoyed this recipe. Thanks for reading :)